
Imperial Star Destroyer |
| By Sean Greenplate |
|
|
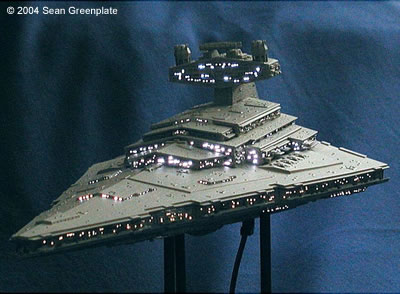
This is my AMT/Ertl Fiber Optic Star Destroyer. This kit lacks ALOT of detail and I thought I could make it look much better. I bought 5' of extra fiber optic strand from this website. Also I opted to use LEDs insted of the incadescent bulbs supplied by the kit. I started by adding alot of detail to the side trenches. Also, I sanded down the thickness of the side trench pieces so that they sat deeper into the top and bottom halves. I built the bridge face from scratch using small pieces of plastic that I cut down to make it look like the bridge that I saw in pictures. I also drilled out the main guns from the top hull and filed them out with a small hobby file. I then made the guns from small bits of plastic and made the barrels of the gun out of thin wire. The shield generators on the top of the bridge are made from plastic jewelry beads and the antennas were added using angel hair pasta. The main hanger was built from scratch as well as the tractor beam generators. I added detail to all of the tiers using small bits of plastic cut down into various sizes to give it a more detailed look. I cut out the hole where the trash comes out to make it more authentic. The engine bells and secondary engines were supplied by Oddessy Slipways. These are highly detailed compared to the stock kit pieces. |
|
Next came the fun part - running all of the fiber optic strands to all of the tiny holes that I drilled out for the strands to mount in to. This part of the construction was very time consuming. But, in the end it was worth all the extra time and effort. I had to put resistors on the LED's so that they wouldn't burn out. The resistors let only enough power that the bulbs need to light up, not too much to burn them out. Once this was all completed and everything was wired up, the hull halves were glued together. I primered the model with Krylon primer. Once this was dry, I gave it a few light coats with Testers Flat Light Aircraft Grey. I then filled any visible seams with more of the aircraft grey. After it was all painted, I had to trim off all of the fiber optic strands that were sticking out of the holes. This also turned out to be very time consuming and once I was finished trimming the strands, some of the paint had to be touched up. Once this was finished, I gave it a few light coats of Dullcoat. I chose not to weather this model because I wanted to give it the sterile look of the Empire. I could go on and on about this model and I also could have added more and more detail, but I wanted to complete it this year.... Image: Stern view Image: Aft starboard quarter: Engines lit Image: The superstructure Image: The bridge Image: The hangar Image: The hangar lit Image: Heavy armament |
|

