![[Starship Modeler's 9th on-line modeling contest: The Other Guys]](other_guys.jpg) |
Contest Rules |
Mitchell-Hyundyne Construction 'Fury |
|
|
|
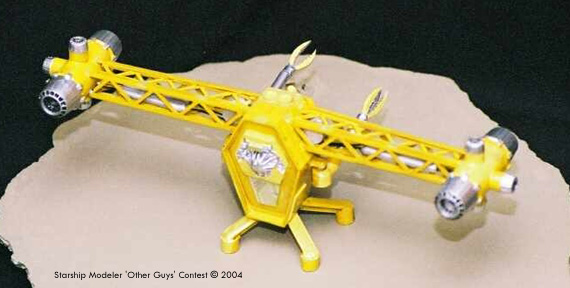
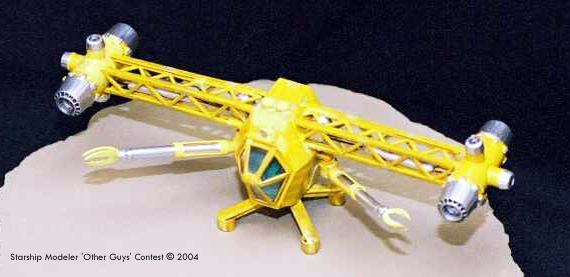
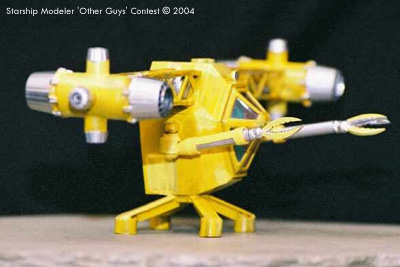
In various fifth season episodes of Babylon 5, in the movie Babylon 5: Thirdspace, and the short-lived Babylon 5: Crusade, the Construction Fury is shown to be a Earth Alliance Starfury-derived spacecraft used for construction, repair work and clearing up after battles or accidents. While there is no canon information concerning the ship, gaming information and fan data show that Mitchell-Hyundyne Construction Fury was designed to maximize performance while conducting construction operations in deep space. Due to the type of work it must do, the Construction Fury's engines were built to produce a lot of thrust, but also be very precise and delicate. Because of it's smaller mass, it is easy to show that the Construction Fury is, in many ways, far more agile than a military Starfury.
Construction After seeing William Blackmore's excellent kitbash of a Maintenance Fury , I decided to tackle building one too. Armed with some excellent high quality images gleaned from several internet sites, I began by hacking off the reactor detail section from a spares box Monogram Starfury kit. The maneuver thruster nozzles mounted on the engine pod and all four forward engine nozzles were also used in this model, as was the cockpit tub and the window canopy. I used sheet styrene to make the hexagonal box that forms the body of the ship, and then mounted the cockpit tub onto that. I then used epoxy putty to build up the sloping sides that make a smooth transition from the leading edge of the cockpit tub to the leading edge of the body of the ship. I had noticed that the wing-like girders that support the engines have a noticeable anhedral (downward angle). Since I used Plastuct girders for this part, it was easy, if time consuming, to trim a piece from the bottom of the two main girders, bend them down, and then glue them to the angle shown. Smaller Plastuct girders cover the top and bottom of the wings. Once these were built, they form hollow boxes which hold, one presumes, the fuel tanks and pumps. The pumps were made from large plastic cylinders, and the fuel tanks from plastic sprue. The lines that connect these parts to the main hull and then to the engines is stiff brass wire, colored black with a Sharpie pen. The engine bodies were made from PVC pipe that fitted neatly into the Starfury exhaust nozzles; the maneuvering thrusters were perched on top styrene tube sections which had been contour sanded on their bottoms to match the curve of the PVC. Small tube sections were added to make the topside detail of the ship's body, while flat pieces of sheet styrene were added to create the lower side body panels. The hacked off the reactor detail section from the Starfury kit was added to the rear of the body, and the legs were made from salvaged plastic coat hanger which already had a nice "T" cross section. The feet themselves were made from more styrene tube, and filled then with gel CA glue and micro balloons. The manipulator arms were made from yet more styrene tube, and these telescoping tubes were attached to the hull by means of an electrical wire connector. A goal of mine was to make these positional, so that the arm could be posed extended or retracted, elevated or lowered, and swung in an arc from under the wings to straight out in front. The claws were carefully trimmed from a solid slug of resin from a prior project, and minor serrations were added. My personal experience using remote manipulators dictated that the three claw design be used -- the two claws used in the show and in fan art look nice, but would be far less effective. The painting consisted of primer, and some of the nastiest yellows that I could find. Silver was used to cover the various exhaust nozzles, parts of the manipulators, and the parts that were to be contained within the wing. A dark gray watercolor art pen was used to add weathering here there and everywhere but my flash wiped most of that off the finished pictures. The spotlight above the cockpit was ground from a clear plastic push pin, and given a dab of silver paint, and the model was done! Image: Left/rear view Image: Right/rear Image: Arms extended Image: Right side |
||
![[Come to papa]](images/scr_17_MaintFurynose01.jpg)
![[Why are you running away?]](images/scr_17_MaintFuryglory.jpg)
This page was last updated 16 January 2004